Sunday, December 30, 2018

Celestial Stars or Xmas Stars

Oh my, how I love this quilt.  EPP.  What more is there to say?

With all the snow in our backyard, it is hard to get a good quilt photo.  So, let's put the thinking cap on and find a way!

This is ok .... but I need a better angle for my quilt journal.
 Not bad, but how about a straight on photo?
 This would be the perfect straight on position.
 Except those vertical bars and the plant are in the way.
Better, but now the chandelier is in the way!
Enter my husband with a long stick ..... to carefully move the chandelier out of the way.  Perfect.
Here are some close-up of my blocks and the custom quilting by my friend Tella in Scarborough.  Tella knows that I don't like tight machine quilting and she worked her magic by giving me what I like.


Now, this quilt.  When you Google the book (see below), the pattern for my quilt is on the front cover.  Except, I did a lot of changes to it.  Made it my own.  Definitely my own.  Google it and see for yourself and then compare the difference.  Sharon's book is gorgeous.  I'll be dipping into it again and taking another of her patterns and then making changes again.  Sorry, but I can't help myself ..... 

Quilt details:
Quilt Name:  Xmas Stars (original pattern name:  Celestial Stars)
Pattern source:  Quilting on the Go .... English Paper Piecing book by Sharon Burgess but with many adaptations (by me) to the original pattern.
Started:  Mar. 12, 2018
Top Finished:  July 25, 2018
Quilt Finished:  September 2018
Quilt Size:  83-3/4" x 83-3/4" (size before washing and drying:  89-1/2" x 89-1/2")
Batting:  Hobbs Heirloom 80/20 on bottom and a layer of Pellon Nature's Touch 100% Wool on top.
Custom machine quilted by Tella in Scarborough.

This quilt never got to be a ufo.  I was determined to get it made and quilted so that it could be part of my trunk shows that I participated in in September and October.  So there.  All EPP with a lot of fussy cutting and it can be done in a timely manner .... not years.... only 4 months from start to top stage!   This quilt proved that point.

In a few days, it will be 2019.  Wishing you all the best and lots of happy stitching for the year to come!

Have a great day!

Wednesday, December 26, 2018

Xmas quilts

It has been a busy few weeks here leading up to Xmas and now I can take a breather.  Whew .....

How about some eye candy of some of my Xmas quilts?

These are on display in our foyer.  The quilt on the wall is one you haven't seen finished and I will chat more about it in another post.
The top you see at the bottom of this photo will be hand quilted sometime next year.  It just had to be hung up with the other coordinating quilts.
Here is a better look of the top.  I just pinned the top onto a hanging sleeve and viola, instant display.  😸😸  I do want to hand quilt it, but haven't quite decided how yet.  For sure, there will be big stitch hand quilting .... but the design has stumped me.  The backing is ready.  Batting purchased.  Just the design.  Sheesh ..... come on brain ..... think, think.
This quilt below you have seen many times before on my blog.  The thing is, it would never lay flat on the wall.  Very wavy.  More hand quilting has been added to the borders, and although the extra quilting has helped, this quilt still will not look as good as I want it to.  This quilt was finished in 2003.  One of my earlier quilts.  It is possible that something wasn't quite right back then and I just proceeded anyway.  I have come to accept that it is what it is and to hang it and enjoy the beauty of this quilt every Xmas.  Amen.
This metal railing finally got a final coat of white paint and a quilt can now be displayed there.  The painting only took six years to finish, but it is finally done!  Well, this section at least.
My quilt ladder and red/white/neutral quilts .... yumm!
What is keeping me busy these days?  Our living room has been taken over for a staining area and I'm busy staining and sealing this bathroom ladder for a niece.   Hubby made it and now it is my turn to finish this ladder.
There is a table runner that I finished and gifted for Xmas and that too will be talked about on a separate post.

A week from now and it will be 2019 ..... wow, this year sure has gone by quickly. 

On an grim note, a cousin is not well and has given up on life.  The new year may not ring in well for our family.

Let's see what can get done this week.  Another ufo crossed off the list?  We'll see.

Have a great stitching day!

Saturday, December 15, 2018

Last day in the garage

Before I get into photos (aka eye candy) of our garage day, how about an update on my log cabin?

There are only two more rows to assemble and sew onto the other sections.  My husband looked at the design wall and said it looks like the tail of a peacock.  It is so colourful and seems to shimmer.  Can I get this old ufo done before 2018 ends?  I think so!  There might have to be a slight tweaking before sewing those last two rows.  There seems to be a few too many darker blocks in the bottom right corner.  I couldn't see that until looking at this photo.
Now onto the garage photos.  OMG .... the eye candy was overwhelming.

Darlene has been busy trying to finish the borders on this top.  She also finished a Xmas panel (on the right) by doing big stitch hand quilting.  She plans to add some bling to it to make it sparkle.
Darlene purchased 2 metres of this printed flannel fabric and is working her flannel stash to add sections between the flower borders.
Below, you can see the diamond shaped sections that will be added to make the top wider.  Photos just don't do justice to how rich looking this printed flannel fabric is.
Claudia has been busy working on a few new projects.  She just purchased the It Takes 2 pattern as well as the embroidery pattern and is making it in blues (blocks on the right).
Below is a new block to be added to the others.  I showed her my few blocks that I had started years ago.  Maybe seeing her progress will prompt me to go back to my old ufo and make some more blocks next year.
Claudia also started Sweet Surrender (the diamond strip with applique).  I don't dare to start that pattern yet as there are way too many ufo's for me to work on.  One day, but not yet.
Karin brought in a wool applique project.  The blocks are stunning.  Another ufo that she should finish!
I did some stitch-in-the-ditch hand quilting on this old quilt that was finished way back in 2003.  This quilt never hanged well on the wall and it needed more hand quilting in the borders.  There was just half a border to do and that got finished yesterday in the garage.  Once home, this quilt got hung up and it hangs wonderfully now.  More on that later.
Lois was busy trimming these blocks for QOV quilts.  Once these were done, she worked on her shamrock blocks (which I didn't take a photo of).
So, that was our day in the garage and might be our last one for 2018.   Between Xmas and New Year's .... well that is a quiet time for most of us and who knows if there will be an impromptu gathering.

I regaled them of my episode about touching Elf on the Shelf and the big do-do that I got myself into.  OMG!  For those of you that don't know about this, please never, ever ..... touch the elf in front of little ones.  The elf will lose it's magic power and a letter to Santa explaining what happened had to take place and Santa had to recharge elf's power back.  It is a REALLY big deal.  Now you know .....

It was just a happy day for all of us working away on old ufo's and new projects.  A day of inspiration and friendship.  What could be better than that!

Have a great stitching day!

Sunday, December 9, 2018

Busy, busy, busy!

I've been plugging away at my log cabins.  Bit by bit, they are getting done!  I even have the backing picked out in advance which you can see laying on the bench.
Only four blocks to go!  Oh my, I can taste the finish coming ....
Done .... the blocks are all done! 
The sewing of the rows is starting.  For the setting side triangles, can you see the striped fabric on the right hand side?  That is what I'm planning to use as long as there is enough fabric.  If not, then plan B will have to be found.  The border fabrics have already been picked out.  Bonus!  I'm on a roll with this project.
Guess what I'll be doing over the next few days?  🐱🐱

Have a great stitching day!

Wednesday, December 5, 2018

Progressing on logs

Well, what a difference a few days make (my previous post shows how this got started).  My log cabin blocks are coming along very nicely.  On most days, about 10 of these blocks can be made.  After a few days, there is a definite change to see.

Below is what I see from my chair.  Plus the mess of fabrics by the door.  That is the stash that I'm working from. 
To make the process handy, four Styrofoam boards are being used.  This one holds my long solid strips (WOF cuts).  By the way, I never realised how many solid fabrics were in my stash, until I seriously started pulling fabrics for this project.  Sheesh .....
 This board holds the smaller pieces of solid strips.
 This one holds my printed long strips (WOF cuts).
This one is for smaller printed strips.
I'm using two cardboard plates to hold my strips that are needed for each block to be cut down into the smaller strip sizes needed.  Two blocks are worked on at the same time.  It is a bit tricky to manage but it works.  As you can see with my selection of fabrics, there are solids and prints in my blocks.  Now, you are probably thinking that these colours aren't very interesting as you see them laid out here.  For example, look at the top plate. 
But once the block is sewn together, it fits quite well with the other blocks.  See the arrow?   Some duller blocks are needed to tame the brighter blocks.  What are all the pink little squares that you see on some of the blocks?  They are pinned in place to remind me that those blocks cannot be moved around.  The other blocks without pink squares can be moved, but not those.
Here is my status for today.  Just thirteen more blocks to do.  At this point, I'm getting very picky on which strips to choose for the remaining blocks.  I need to balance out the overall look so that darks are evenly spaced out, because that is where the eye will be drawn to.  My progress will slow down a bit now.
By Xmas, I would like to get this top done and ready the backing so that it can go to my favourite LAer.  There is still a lot of work to do before that can happen.  Like setting side triangles and borders .... aagh!

The other thing that is keeping me occupied is painting some drawers that my DH made for our pantry.  They will be so much handier to use.  Right now, my living room is a painting station.  I really need to get them done so that the Xmas tree can go up.

What else?  Some Xmas stuff.

Have a great stitching day!

Linking to: http://www.esthersquiltblog.com/ and http://needleandthreadnetwork.blogspot.com/

Sunday, December 2, 2018

An old ufo

I'm working on an old UFO from 2013.  It really isn't that old compared to other UFO's on my shelf, but it is old enough.

Here is what it looked like when I just started it in Feb. 2013.  Why did I stop?  Probably something else came along, but it was the block size that did it.  Too big .... much too big.  So, into a bin they went and stewed for many years.
 
When I decided to work on them again, my seam ripper came out of hiding and I ripped out four rows off each block.  Much, much better now.  They will finish at 7-1/2" instead of 13".  Big difference, eh!
Good progress has been made lately, but I don't have any update photos handy.  They will come later this week.

There was no garage girl get-together this week.  Darlene's hot water thank sprung a leak and she would have been busy with the repair guys, so our meeting was cancelled.  Oh well, I stayed home and sewed.

Have a great day!

Wednesday, November 28, 2018

Crazy Patch Pumpkins

Sixteen days!  That is how long it took me to make this top!  Shocking, I know!  Usually it takes years before a top gets finished.  Sixteen days.

Before you see the finished top, let me show you my progress along the way.

There were lots of orange/autumn scraps from previous quilts and I wanted to use them up.  Plus two bins of the same colour fabrics to use for the borders and for the pumpkins.

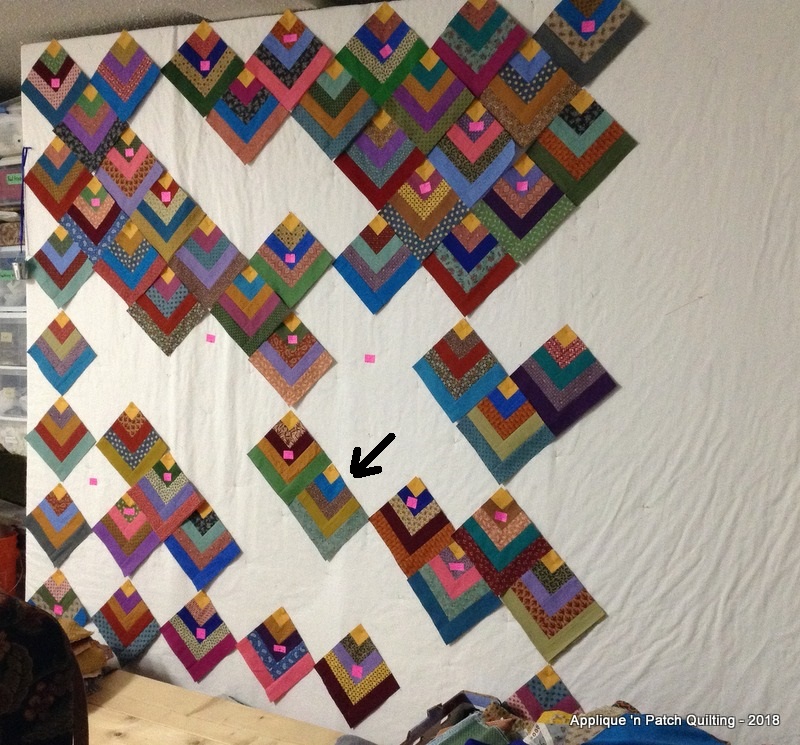
As each row got finished (or almost), the blocks got sewn together as much as possible (see the top two rows).  The piano key borders were cut out for all four sides and any scraps left from those cuttings, got added to my scraps to play with.  I found that if part of the pumpkin was sewn together, it prompted me to work on the crazy patch centers.  Good motivation for me.
My scraps were placed on a piece of Styrofoam that was next to my sewing machine so that I could rummage through the scraps as each crazy patch center was made. 
There were also scraps on my cutting table to rummage through as well.
On a good day, I could get three centers made and then finish sewing three pumpkin blocks together as well as sewing some of piano keys as well as doing applique and embroidery.  There was a production line going on as many parts of the top were assembled during the day.

Oh, so close.  Just the two outside borders to sew on!  I do like my corners on the borders.  Crazy patches there too! 
Ta da!  Top is finished!
On my bench, that is in front of my design wall, are pieces of fabric that will be used for the backing.  That lovely pumpkin fabric is gorgeous and perfect for this top, but there is not enough of it.  So, my backing will be pieced.  It will add to the overall patchy look of this top.  In case anyone is wondering, my bench is made up of two 8' long x 6" wide planks of wood that are scewed together.  I walk on that as stuff is pinned onto my design wall.  Safer for me instead of having a stool that gets pushed along the floor.
A close-up of a maple leaf with embroidery.  My background neutral fabric is leftovers from a backing on another quilt.  Some of the centers for my maple leaves are patched.  If you look closely, you can see a vertical seam in the centre.  Use it up!  🐱🐱
 Here are some of my crazy patch centers.
Once my scraps were cleaned up, this is what was left of them.  Just a baggy.  Now that is awesome!
How did I get started on this project?  My friend, no-blog Mary in Toronto wanted to do a pumpkin quilt and would I join her in this venture.  Sure, why not.  This is her top.  Her centers are signature blocks from a block swap that she joined in.  Clever on her part.  She showed me a photo of a quilt that she saw on Pinterest (no idea where the pattern came from) and I drafted the block for us to use.
So, that is the story of our pumpkin tops.

The last few days we have had a lot of snow.  My sister sent this photo to me last night.  Deer were in her front yard.  This one wanted to check out the Xmas decorations.  Too cute!
What is up next for me?  An old ufo has been pulled off the shelf.  That will be next week's post.  Tomorrow is a garage day.  Oh, what fun we will have and what will we bring to show off to each other?

Have a great day!

Linking to: http://www.esthersquiltblog.com/ and http://needleandthreadnetwork.blogspot.com/